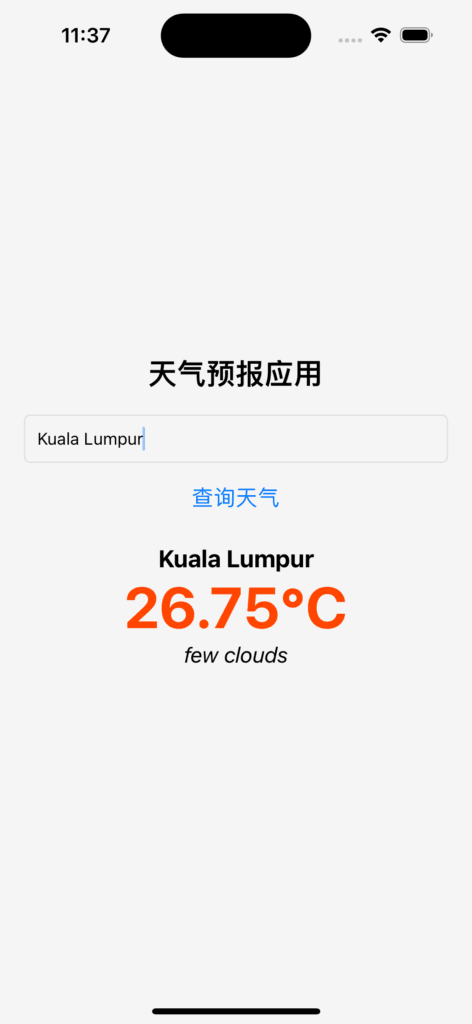
本文将手把手教您如何使用 React Native 和 Expo 来开发一个简单的 iOS 天气预报应用。我们将从环境配置开始,一步步完成一个可以运行在 iPhone 上的天气应用。
📚 Materials/References: GitHub Repository (give it a star ⭐): https://github.com/kokiyodesu/WeatherApp
README :
https://github.com/kokiyodesu/WeatherApp/blob/main/README.md
第一步:设置开发环境
在开始之前,请确保您已完成以下工具的安装和准备:
1. 安装开发工具 (这里推荐使用Visual Studio Code)
- 前往 Visual Studio Code 官方网站 下载Visual Studio Code并安装。
- 安装完成后,打开Visual Studio Code:
- 从Start选项中,点击Open并选择项目安装目录。
- 选择安装目录后,点击最上方Terminal,并选择New Terminal

2. 安装 Node.js
- 前往 Node.js 官方网站 下载 LTS 版本并安装。
- 安装完成后,在Terminal中输入一下命令验证安装:
node -v
npm -v
3. 安装 Expo CLI
- 使用 npm 安装 Expo CLI:
npm install -g expo-cli- 验证安装:
expo --version4. 安装 Xcode
- 从 Mac App Store 下载并安装 Xcode。
- 确保安装完成后打开 Xcode,接受许可协议并安装必要的组件。
5. 安装 Expo Go App
- 在您的 iPhone 上安装 Expo Go(从 App Store 获取),用于实时预览和调试应用程序。

第二步:创建 React Native 项目
1. 创建项目
打开Visual Studio Code,并且打开项目的文件夹


在下面的Terminal中输入下方命令,在命令中添加”.\”是把项目安装至当前文件夹,出现>后再按下回车键。
npx create-expo-app@latest .\
2. 启动开发服务器
npx expo start
**如有出现下列报错,按下Ctrl+C退出服务器。

**并请运行下方命令,并输入系统登入密码,这是因为创建项目时,因为权限问题而导致package安装不完整。
sudo npm install
3. 预览初始程序
使用iPhone相机扫描Terminal中的QR代码,确保程序能够正常运行。

初始程序正常运行后,点击”+”按键并打开新的Terminal,输入下方命令重置项目,就开始制作我们的天气预报App了。
npm run reset-project
重置项目后,可以回到上一个terminal中,按下”r”键,重新加载我们的程序。


第三步:开发天气预报应用
1. 安装依赖
回到,我们的第二个Terminal中,输入下方命令安装用于网络请求和状态管理的库:
npm install axios2. 获取 API Key
- 注册一个免费的 OpenWeatherMap 账号。
- 登录后获取您的 API Key,用于访问天气数据。

3. 创建基本 UI
打开 app/index.tsx 文件,编辑如下代码:
import React, { useState, useEffect } from 'react';
import { StyleSheet, Text, View, TextInput, Button, ActivityIndicator } from 'react-native';
import axios from 'axios';

const API_KEY = '你的_OpenWeatherMap_API_Key';

export default function App() {
  const [city, setCity] = useState('');
  const [weather, setWeather] = useState(null);
  const [loading, setLoading] = useState(false);

  const fetchWeather = async () => {
    if (!city) return;
    setLoading(true);
    try {
      const response = await axios.get(
        `https://api.openweathermap.org/data/2.5/weather?q=${city}&units=metric&appid=${API_KEY}`
      );
      setWeather(response.data);
    } catch (error) {
      alert('无法获取天气信息,请检查城市名称或网络连接。');
    } finally {
      setLoading(false);
    }
  };

  return (
    <View style={styles.container}>
      <Text style={styles.title}>天气预报应用</Text>
      <TextInput
        style={styles.input}
        placeholder="输入城市名称"
        value={city}
        onChangeText={setCity}
      />
      <Button title="查询天气" onPress={fetchWeather} />
      {loading && <ActivityIndicator size="large" color="#0000ff" />}
      {weather && (
        <View style={styles.weatherContainer}>
          <Text style={styles.city}>{weather.name}</Text>
          <Text style={styles.temp}>{weather.main.temp}°C</Text>
          <Text style={styles.description}>{weather.weather[0].description}</Text>
        </View>
      )}
    </View>
  );
}

const styles = StyleSheet.create({
  container: {
    flex: 1,
    justifyContent: 'center',
    alignItems: 'center',
    backgroundColor: '#f5f5f5',
    padding: 20,
  },
  title: {
    fontSize: 24,
    fontWeight: 'bold',
    marginBottom: 20,
  },
  input: {
    width: '100%',
    height: 40,
    borderColor: '#ddd',
    borderWidth: 1,
    borderRadius: 5,
    paddingHorizontal: 10,
    marginBottom: 10,
  },
  weatherContainer: {
    marginTop: 20,
    alignItems: 'center',
  },
  city: {
    fontSize: 20,
    fontWeight: 'bold',
  },
  temp: {
    fontSize: 48,
    fontWeight: 'bold',
    color: '#ff4500',
  },
  description: {
    fontSize: 18,
    fontStyle: 'italic',
  },
});
记得把代码中的API_KEY粘贴上您的Open Weather Map API Key。
const API_KEY = '你的_OpenWeatherMap_API_Key'然后回到第一个Terminal中,按下”r”键重新加载程序。
第四步:测试应用
1. 使用Expo Go App测试应用
- 按下”r”键后,Expo 会自动重新加载您的应用程序。
- 在 iPhone 上输入城市名称,例如 “Kuala Lumpur” 或 “Taiwan”,点击 查询天气。
- 查看显示的天气数据。
- 懂得React/TypeScript的小伙伴们可以自己调整index.tsx里的代码,让App功能更丰富。

第五步:构建项目
在app.json文件中加入下列代码至”ios”和”android”内并保存。ios.bundleIdentifier 和 android.package: iOS 和 Android 的包名,确保唯一。
   "ios": {
      "bundleIdentifier": "com.yourname.weatherapp"
    },

    "android": {
      "package": "com.yourname.weatherapp",
    }
Expo 提供了两种方式来构建项目:
如果还没有Expo帐户可以到Expo官方网站申请新帐户。
**免费帐户构建需要花费时间会比较长,请耐心等待。
方法 1.1:使用 eas build (发布到App Store / Play Store)
EAS Build 是 Expo 的增强型构建服务,支持生成独立的 .apk 或 .ipa 文件,需要有效的Apple Developer Account。
Apple Developer Program 的年费为99 美元,Apple Developer Enterprise Program 的年费为299 美元(如果适用,则以当地货币计费)。
安装 EAS CLI:
npm install -g eas-cli
配置 EAS:
运行以下命令并根据提示完成配置:
eas build:configure
构建项目:
构建 iOS:
eas build --platform ios**由于作者Apple Developer Account已经到期,所有无法展示如何上传至App Store。
构建 Android :
eas build --platform android

成功构建后,可以按下Download按钮,下载.aab文档并上传到您的Play Store Console。
查看构建状态:
构建完成后,Expo 将生成一个链接供你下载 .apk 或 .ipa 文件。
方法 1.2:使用 eas build -p ios (iOS模拟)
在eas.json配置中,添加下方代码:
"ios": {
  "simulator": true
} 
然后运行下方指令:
eas build -p ios --profile preview请注意,–profile可以随意命名。在上面的例子中,它被称为”preview”。但是,您可以将其称为”local”、”simulator”或任何最有意义的名称。
方法 2:发布到 Expo Go
如果你只是想快速运行或分享项目,可以发布到 Expo 的服务器上,直接在 Expo Go App 中查看。
发布到 Expo:
eas update完成后,你会收到一个链接(例如:https://expo.dev/accounts/yourname/projects/WeatherApp/),可以通常Expo Go App 打开。

打开EAS Dashboard,登入您的Expo帐户,点击上方的Preview按钮

使用iPhone相机扫描QR Code或打开下方的URL,就可以在Expo Go App中打开您的App了,

您现在已成功构建了一个简单的天气预报应用,并可以运行在 iPhone 上!如果有什么疑问,欢迎在下方留言交流。
